基于Android 6.0的源码剖析, 分析Binder IPC通信的权限控制方法clearCallingIdentity和restoreCallingIdentity的原理和用途。
frameworks/base/core/java/android/os/Binder.java
frameworks/base/core/jni/android_util_Binder.cpp
frameworks/native/libs/binder/IPCThreadState.cpp
一、概述
在Binder系列中通过十篇文章,深入探讨了Android M的Binder IPC机制。看过Android系统源代码的朋友,一定看到过Binder.clearCallingIdentity()和Binder.restoreCallingIdentity()这两个方法,其定义在Binder.java文件:
//作用是清空远程调用端的uid和pid,用当前本地进程的uid和pid替代;
public static final native long clearCallingIdentity();
//作用是恢复远程调用端的uid和pid信息,正好是`clearCallingIdentity`的反过程;
public static final native void restoreCallingIdentity(long token);
这两个方法涉及的uid和pid,每个线程都有自己独一无二的IPCThreadState对象,记录当前线程的pid和uid,可通过方法Binder.getCallingPid()和Binder.getCallingUid()获取相应的pid和uid。
clearCallingIdentity(), restoreCallingIdentity()这两个方法使用过程都是成对使用的,这两个方法配合使用,用于权限控制检测功能。
二、原理
从定义这两个方法是native方法,通过Binder的JNI调用,在android_util_Binder.cpp文件中定义了native方法所对应的jni方法。
2.1 clearCallingIdentity
[-> android_util_Binder.cpp]
static jlong android_os_Binder_clearCallingIdentity(JNIEnv* env, jobject clazz)
{
    //调用IPCThreadState类的方法执行
    return IPCThreadState::self()->clearCallingIdentity();
}
2.1.1 IPC.clearCallingIdentity
[-> IPCThreadState.cpp]
int64_t IPCThreadState::clearCallingIdentity()
{
    int64_t token = ((int64_t)mCallingUid<<32) | mCallingPid;
    clearCaller();
    return token;
}

void IPCThreadState::clearCaller()
{
    mCallingPid = getpid(); //当前进程pid赋值给mCallingPid
    mCallingUid = getuid(); //当前进程uid赋值给mCallingUid
}
- mCallingUid(记为UID),保存Binder IPC通信的调用方进程的Uid;
- mCallingPid(记为PID),保存Binder IPC通信的调用方进程的Pid;
UID和PID是IPCThreadState的成员变量, 都是32位的int型数据,通过移位操作,将UID和PID的信息保存到token,其中高32位保存UID,低32位保存PID。然后调用clearCaller()方法将当前本地进程pid和uid分别赋值给PID和UID,最后返回token。
2.2 restoreCallingIdentity
[-> android_util_Binder.cpp]
static void android_os_Binder_restoreCallingIdentity(JNIEnv* env, jobject clazz, jlong token)
{
    //token记录着uid信息,将其右移32位得到的是uid
    int uid = (int)(token>>32);
    if (uid > 0 && uid < 999) {
        //目前Android中不存在小于999的uid,当uid<999则抛出异常。
        char buf[128];
        jniThrowException(env, "java/lang/IllegalStateException", buf);
        return;
    }
    //调用IPCThreadState类的方法执行
    IPCThreadState::self()->restoreCallingIdentity(token);
}
2.2.1 IPC.restoreCallingIdentity
[-> IPCThreadState.cpp]
void IPCThreadState::restoreCallingIdentity(int64_t token)
{
    mCallingUid = (int)(token>>32);
    mCallingPid = (int)token;
}
从token中解析出PID和UID,并赋值给相应的变量。该方法正好是clearCallingIdentity的反过程。
2.3 getCallingPid
[-> android_util_Binder.cpp]
static jint android_os_Binder_getCallingPid(JNIEnv* env, jobject clazz)
{
    return IPCThreadState::self()->getCallingPid();
}
2.3.1 IPC.getCallingPid
[-> IPCThreadState.cpp]
pid_t IPCThreadState::getCallingPid() const
{
    return mCallingPid;
}

uid_t IPCThreadState::getCallingUid() const
{
    return mCallingUid;
}
2.4 远程调用
2.4.1 binder_thread_read
binder_thread_read(){
    while (1) {
      struct binder_work *w;
      switch (w->type) {
        case BINDER_WORK_TRANSACTION:
            t = container_of(w, struct binder_transaction, work);
            break;
        case :...
      }
      if (!t)
        continue; //只有BR_TRANSACTION,BR_REPLY才会往下执行

      tr.code = t->code;
      tr.flags = t->flags;
      tr.sender_euid = t->sender_euid; //mCallingUid

      if (t->from) {
          struct task_struct *sender = t->from->proc->tsk;
          //当非oneway的情况下,将调用者进程的pid保存到sender_pid
          tr.sender_pid = task_tgid_nr_ns(sender,current->nsproxy->pid_ns);
      } else {
          //当oneway的的情况下,则该值为0
          tr.sender_pid = 0;
      }
      ...
}
2.4.2 IPC.executeCommand
status_t IPCThreadState::executeCommand(int32_t cmd)
{
    BBinder* obj;
    RefBase::weakref_type* refs;
    status_t result = NO_ERROR;

    switch ((uint32_t)cmd) {
        case BR_TRANSACTION:
        {
            const pid_t origPid = mCallingPid;
            const uid_t origUid = mCallingUid;
            mCallingPid = tr.sender_pid; //设置调用者pid
            mCallingUid = tr.sender_euid;//设置调用者uid
            ...
            reinterpret_cast<BBinder*>(tr.cookie)->transact(tr.code, buffer,
                        &reply, tr.flags);
            mCallingPid = origPid; //恢复原来的pid
            mCallingUid = origUid; //恢复原来的uid
        }

        case :...
    }
}
关于mCallingPid、mCallingUid的修改过程:是在每次Binder Call的远程进程在执行binder_thread_read()过程, 会设置pid和uid. 然后在IPCThreadState的transact收到BR_TRANSACION则会修改mCallingPid、mCallingUid。
这里需要注意的是,当oneway的的情况下mCallingPid=0,不过mCallingUid可以拿到正确值。
三、用途
3.1 场景分析
场景:首先线程A通过Binder远程调用线程B,然后线程B通过Binder调用当前线程的另一个service或者activity之类的组件。
分析:
- 线程A通过Binder远程调用线程B:则线程B的IPCThreadState中的
mCallingUid和mCallingPid保存的就是线程A的UID和PID。这时在线程B中调用Binder.getCallingPid()和Binder.getCallingUid()方法便可获取线程A的UID和PID,然后利用UID和PID进行权限比对,判断线程A是否有权限调用线程B的某个方法。 - 线程B通过Binder调用当前线程的某个组件:此时线程B是线程B某个组件的调用端,则
mCallingUid和mCallingPid应该保存当前线程B的PID和UID,故需要调用clearCallingIdentity()方法完成这个功能。当线程B调用完某个组件,由于线程B仍然处于线程A的被调用端,因此mCallingUid和mCallingPid需要恢复成线程A的UID和PID,这是调用restoreCallingIdentity()即可完成。
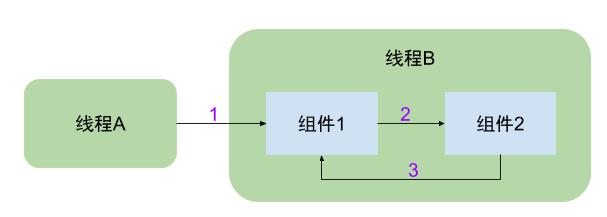
一句话:图中过程2(调用组件2开始之前)执行clearCallingIdentity(),过程3(调用组件2结束之后)执行restoreCallingIdentity()。
3.2 类比分析
看完场景分析,估计还有不少朋友感到迷惑,为何需要这两个方法来多此一举,直接检测最初调用端的权限不就行了吗?为了更加形象明了地说明其用途,下面用一个生活中的场景来类比说明。
场景:假如你的朋友请你帮忙,给她(他)到你的公司以内部价购买公司的某个产品。
分析:这个过程分为两个阶段
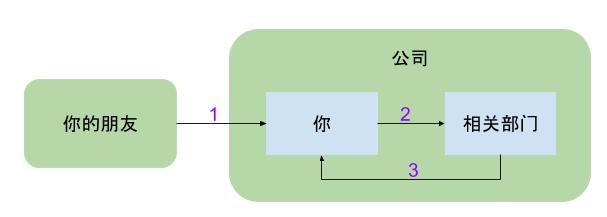
- 第一阶段:你的朋友请你帮忙的过程,这个过程并不一定所有朋友都会帮的,这时就需要一个权限检测,那么在你的朋友”远程调用”你执行任务时,你会记录他的”Identity”信息(比如是性别),有了信息那么就可以权限检测,不妨令权限规则是如果这个朋友是女性则答应帮忙,否则就认定权限不够拒绝执行(可能黑客会想到先去一趟泰国,权限控制可能相应需要打补丁了),若答应帮忙则进入第二阶段,否则直接返回。
- 第二阶段:你向自己所在公司的相关部门内购产品的过程,这个过程也并不是所有人都能权限能够内购的,只有自己公司的员工才行,否则你的朋友也不会找你帮忙了。 这个过程同样需要权限检测,但是”Identity”保存的是性别女的信息,公司内购产品如果也以性别来判断,那岂不是公司的所有男员工没有权限内购,那这公司就有点太坑了,这明显不符合实情。
clearCallingIdentity()是时候该登场了,在第二阶段开始之前,先执行clearCallingIdentity()过程,也就是把”Identity”信息清空,替换为你的信息(比如员工编码ITCode之类的),那公司相关部门通过ITCode就可以直接判断是否允许内购某产品。当第二阶段完成后,也就是你已经购买到了公司产品,这时你需要将产品交付给你的朋友,需要restoreCallingIdentity,恢复”Identity”为女的信息,这样就嗯呢该顺便交付给你的女朋友。如果不恢复信息,还是原来的ITCode,你交付的朋友可能是男的,另有其人,这样就不科学了。
相信到此,大家应该都能明白这两个方法的作用,缺一不可,而且要成对出现。
3.3 实例分析
上述过程主要在system_server进程的各个线程中比较常见(普通的app应用很少出现),比如system_server进程中的ActivityManagerService子线程,代码如下:
[–>ActivityManagerService.java]
@Override
public final void attachApplication(IApplicationThread thread) {
    synchronized (this) {
        //获取远程Binder调用端的pid
        int callingPid = Binder.getCallingPid();
        //清除远程Binder调用端uid和pid信息,并保存到origId变量
        final long origId = Binder.clearCallingIdentity();
        attachApplicationLocked(thread, callingPid);
        //通过origId变量,还原远程Binder调用端的uid和pid信息
        Binder.restoreCallingIdentity(origId);
    }
}
文章startService流程分析中有讲到attachApplication()的调用。该方法一般是system_server进程的子线程调用远程进程时使用,而attachApplicationLocked方法则是在同一个线程中,故需要在调用该方法前清空远程调用者的uid和pid,调用结束后恢复远程调用者的uid和pid。
微信公众号 Gityuan | 微博 weibo.com/gityuan | 博客 留言区交流